Here’s what’ new in the latest ARI release V9.6.6
We’re happy to announce that the new ARI update is finally live. Before you continue, please make sure you update your app to the latest version V9.6.6 by following this update guide.
What’s new in this update?
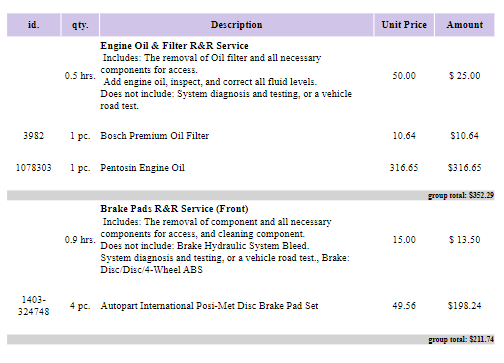
Group labor and parts together for a better invoice experience
You can now group together a service with its relevant parts and display that grouping on your invoice so clients can easily read and understand which parts have been used for which service.
This is a major improvement for ARI and we strongly recommend using it as it has the potential to really improve your client’s invoicing experience
Here’s how grouped items will look like on invoices
Limited Access to Payments
We have added a new section to the User Roles that allows you to control user access to the Payment module. You can now allow or deny access to view, create, edit and delete functions of the payment module.
By default, the access is revoked so you will need to edit your user roles access in order to allow access to the payments module.
Login and go to Profile then click on the User Roles button. Select the role you want to edit and click the Edit icon. Scroll down to the payments section and edit the access. Go back to your users and reassign the role.
Save and then re-log your users for changes to take effect.
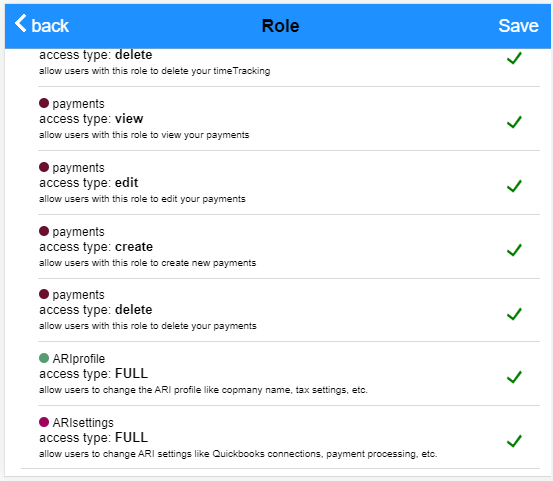
NOTE: If you don’t see the Payments section in your Role list, then please create a new Role and then assign that new role to your user and re-log!
Read More About User Roles Here
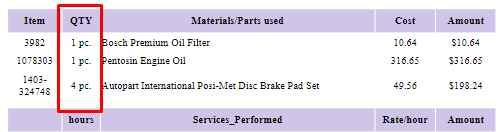
Show/Hide Units on your Auto Repair Invoice
You can now display units such as pc. gal. hrs. on your invoice. All you need to do is go to ARI Settings and click on the Invoice Template Settings
From the list menu, scroll down and activate Show Units.
Save and now open an invoice and check the form.
You should be able to see the units displayed after the qty just like in the image below
Read More About Invoice Settings Here
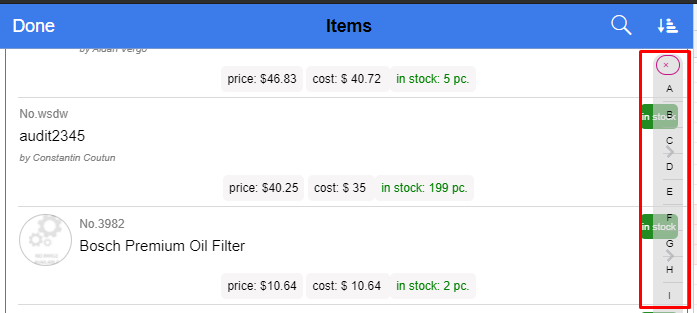
Sorting on Parts, Tires, and Clients
You can now sort and filter your parts list in inventory by various criteria. We have also added a very useful alphabetical filter bar that will allow you to easily navigate through your inventory.
Learn More About Sorting and Filtering
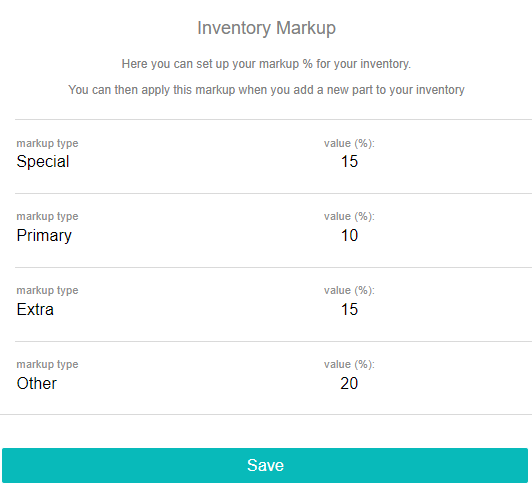
Multiple Parts Markup
You can now have up to 3 markup values setup in your profile as opposed to just one. Then you can access your markup matrix from anywhere inside the Inventory, JobCards or Purchase modules.
Head out to Profile and click on Parts Markup to setup your matrix.
Learn more about Setting Up Your ARI Profile
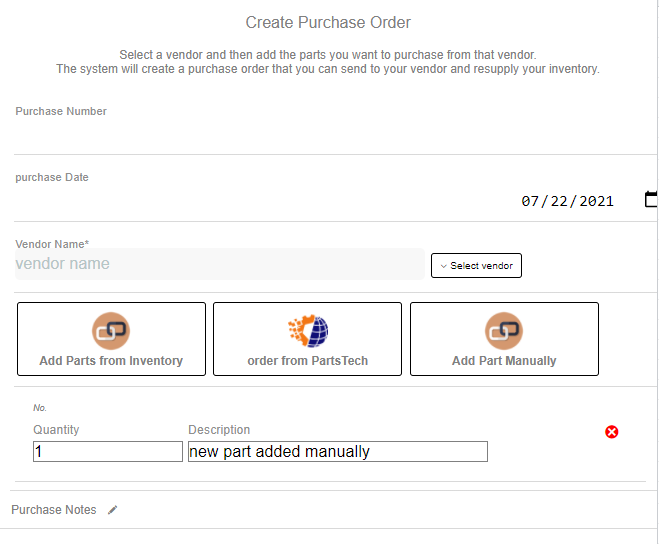
Purchase Module updates
We have made the following changes to the Accounting/Purchases section
- when ordering a part from inventory, the system will pre-fill the quantity field based on your stock quantity and the minimum critical count setup for that part.
- the system will pre-fill the previous cost and price of a part during Receiving status
- you can now order parts that are not in your inventory stright from the Purchase page. The system will add these parts in your inventory once the status of the purchase is changed to Received
- exposed part number to the Purchase Order form
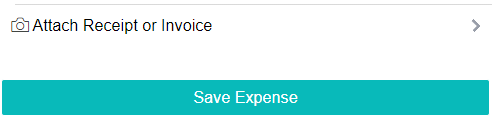
Expenses module update
We have also made some changes to the Expenses module of ARI
- added consumable items to the Expense Type list
- you can add more than one expense type for the same expense record
- you can attach a receipt or invoice picture to your Expense
Read More About Accounting Module
Inventory Count Fix
Many of you have reported issues with the inventory count not being accurate. That issue is fixed now.
We have added a confirmation popup that will prompt you to update your inventory every time you save your JobCards or Invoices. This way, if you edit your invoices, then make sure you don’t subtract the parts from your inventory upon resaving.
The message looks like this:

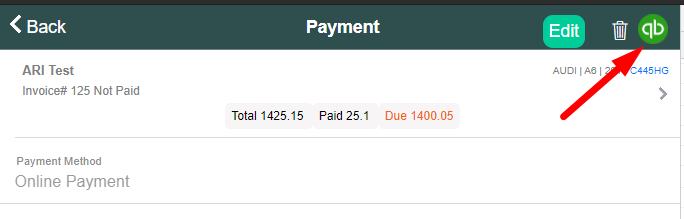
Send Payment to QuickBooks
You can now sync your ARI payments to your QuickBooks Online account. All you have to do is go to Payments, open the payment you want to sync and click the QuickBooks button on the upper right corner.
Make sure that your Invoice is synced to QuickBooks in advance.
Other changes
- jobcards search by make, model, license plate
- service reminder email and notification fix
- display labor id on invoice
- order from PartsTech button added to create part page
- expose invoice and PO numbers in Purchases
- billing statement print fits the screen
- wide screen on Web version
- Jobcard/Invoice numbers generated based on last max number
- send local notification to users when job assigned
- display number of clients and vehicles on their respective pages
We hope you find this ARI update useful. As always, let us know if you want any changes done to the system so we can add them to our next release.