3 Steps To Undergoing a Professional Car Inspection with ARI
Vehicle inspection tasks are the building block to any reputable auto repair business. Before you start working on a car, it just makes sense to first do an inspection first. Depending on the car issue reported by the owner, the inspection can differ from a simple oil check to a full-blown 50-point inspection process.
In this blog post, we’ll show you how to create a car inspection in just 3 steps using the ARI software!
Step 1: Select/Add a Client
Although inspections can be done by choosing just a vehicle, we strongly recommend that you also keep track of your client info. This could turn out to be very useful later on when you want to check all inspections you’ve done for a specific customer or how much money a customer has spent on your shop for the past years for eg.
Log into ARI and click on the Inspections button. On the next page, you will see all the car inspections you have created so far (or a blank page if you’ve never created an inspection yet). Click on the PLUS button to start a new inspection. After that, tap on the Client name and choose an existing customer or add a new one right away
Step 2: Select/Add a Vehicle
Unlike clients, selecting a vehicle is mandatory in order to create an inspection in ARI. So go ahead and click on the Vehicle button and then select an existing record or create a new one. Once the vehicle record is added or selected, you can start working on the inspection itself.
Step 3: Fill In the Checklist
This is the part when the real work of a mechanic actually begins. In order to fill in the checklist, the technician needs to assess the vehicle’s condition such as driving experience, exterior inspection, electrical system, under the hood, bumper to bumper, interior inspection, and many other items.

Rearrange Your Check Items
If you wish to change the order of the items in the checklist, just drag and drop the entire row from the arrow icons. You can also add comments and notes to each item in the Details section of the table. Finally, you can delete the items you don’t need.
Customize your checklist template
You can also add more items to the checklist if needed or change the template or create your own template altogether. ARI comes with several built-in vehicle inspection templates:
- 50-Point Inspection
- Level 1 inspection
- Pre-Sale Inspection
- Heavy-Duty Inspection
- Motorcycle Inspection
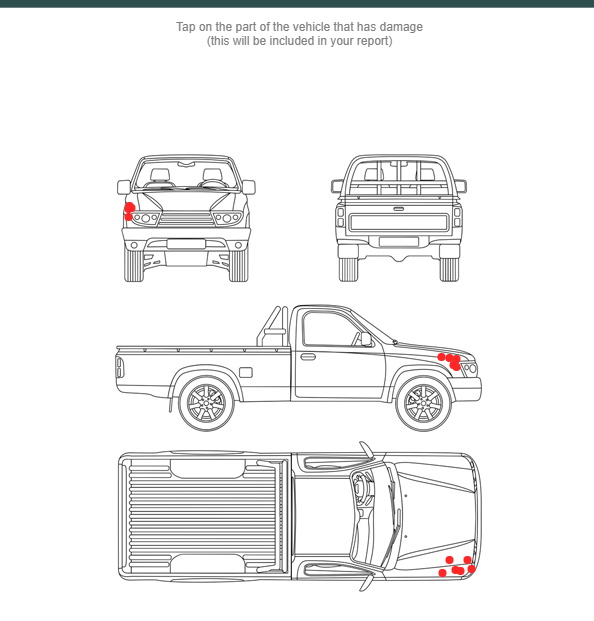
Create a Damage Report (Optional)
If you are doing an inspection for a vehicle that has been involved in an accident, then it’s important to mark the areas of the car that have suffered damages. This can be very useful for damage claims or other insurance purposes, later on, so make sure you do it if possible!
Add a Picture (Optional)
ARI allows you to add pictures to your vehicle inspection report. This can be very useful in cases where damage is noticed and so a picture will allow the owner to see the damage themselves before deciding how to proceed with the repairs.
Save and Share/Print
Finally, now that your inspection is complete, go ahead and Save it. After that, you will have the possibility to send it to the client via email or print it. You can also edit any additional info that goes on the report, including your own comments.
In conclusion, we strongly recommend that you use the Inspection feature of ARI as often as possible as it gives your business that credibility and professional appeal that any business should possess in order to succeed!