

Your Booking Page Now Fits Right Into Your Website
If you already share your ARI booking link with clients, you know how convenient online booking is—customers pick a time, fill in their info, and the appointment shows up on your calendar automatically. However, sending people to a separate page means they leave your website, and that is often where you lose potential leads.
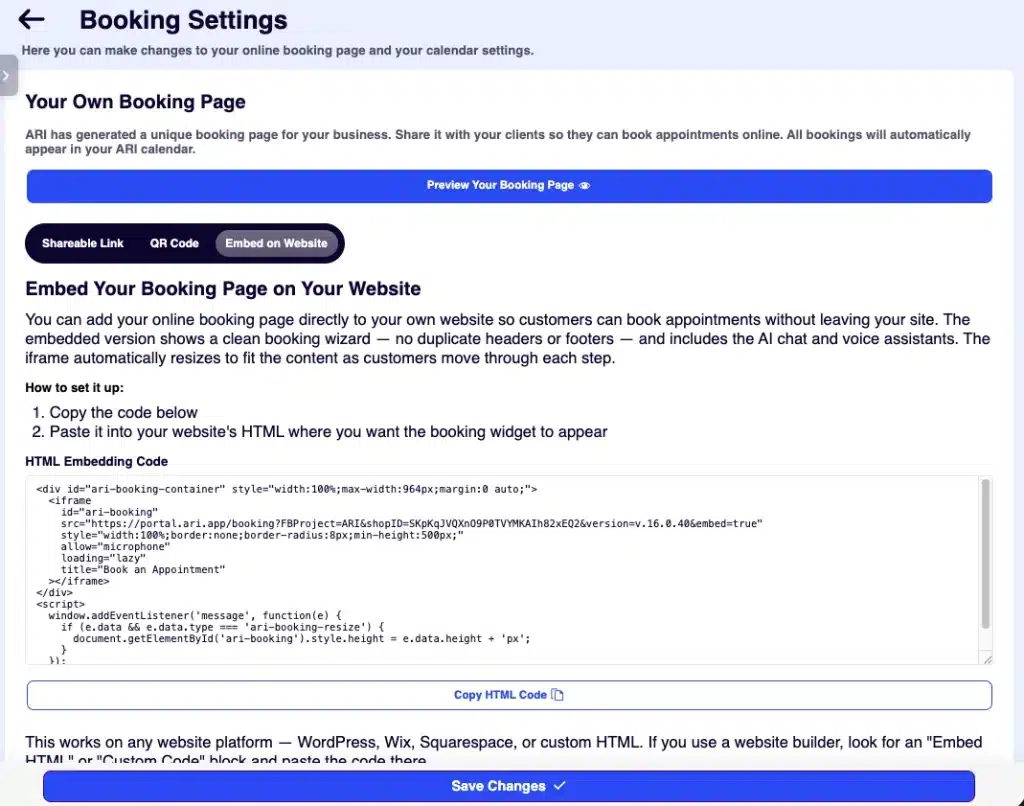
With this update, you can embed your full booking experience directly on your own website. Clients book appointments without ever navigating away from your site. The embedded version shows a clean booking wizard—no duplicate headers or footers—and includes the AI chat and voice assistants so customers can get help while they book.
What’s New?
The previous embed code was a basic iframe with a fixed size. While it worked, it wasn’t ideal; content would often get cut off or display unnecessary scrollbars depending on the screen size.
The new embed code is a complete drop-in widget featuring:
- Auto-resizing: The iframe adjusts its height automatically as customers move through each step of the booking process. No more scrollbars or awkward white space.
- Responsive width: The widget fills 100% of its container (up to 964px), ensuring it looks perfect on desktop, tablet, and mobile.
- AI Assistants Included: The embedded version enables the microphone for ARI’s voice assistant, allowing clients to interact with it just like on the standalone page.
- Clean, Modern Styling: Rounded corners and no borders provide a polished look that blends into any website design.
How to Set It Up
1. Get Your Embed Code
Go to Appointments > Settings and tap the Embed on Website tab. You’ll see your personalized embed code with your shop ID already filled in.
2. Copy the Code
Tap Copy HTML Code. The full snippet—including the container, iframe, and resize script—is copied to your clipboard.
3. Paste It Into Your Website
Open your website editor and paste the code wherever you want the booking widget to appear. That’s it!
Platform Integration Guide
| Platform | Where to Find It |
| WordPress | Add a “Custom HTML” block in the page editor |
| Wix | Add an “Embed a Site” or “Custom Element” block |
| Squarespace | Add a “Code” block in the page editor |
| Custom HTML | Paste directly into your page’s HTML |
Note: The widget works on any platform that supports custom HTML.
Before and After
- Before: A fixed-size iframe that didn’t adapt to the booking steps. Clients would see scrollbars or cut-off content, especially when using ARI (Auto Repair Software) on smaller screens.
- After: A responsive widget that grows and shrinks with the content. Clients move through the booking wizard smoothly, and the page looks clean at every step.
Where to Find It
- Open Calendar from the main menu.
- Tap Booking Settings (the gear icon).
- Go to the Embed on Website tab.
- Copy the code and paste it on your site.
The embed code is personalized to your shop; it already includes your shop ID, so clients who book through it are automatically connected to your ARI calendar.
Already Using the Old Embed Code?
If you previously embedded the booking page on your website, we strongly recommend replacing the old iframe with the new code. Just copy the updated snippet from the Embed tab and swap it in. The new version is a direct replacement—same booking flow, better experience.
Team ARI