
A digital vehicle inspection is only as useful as the report it produces.
Checking every box is not enough if the photos are blurry, the status labels mean different things to different technicians, or the customer receives a list of findings without understanding what matters now and what can wait.
A strong DVI workflow turns the technician's inspection into a clear record:
The right checklist → consistent findings → useful evidence → quality review → customer-ready report → next service step
This guide shows small repair shops and mobile mechanics how to build that workflow without turning every inspection into extra paperwork.
Quick answer: A customer-ready digital vehicle inspection report identifies the client and vehicle, uses a checklist appropriate to the visit, applies consistent condition labels, supports important findings with clear photos and factual notes, and receives a quality review before it is shared. It documents what the technician observed; an estimate or work authorization should handle the recommended repair and price.
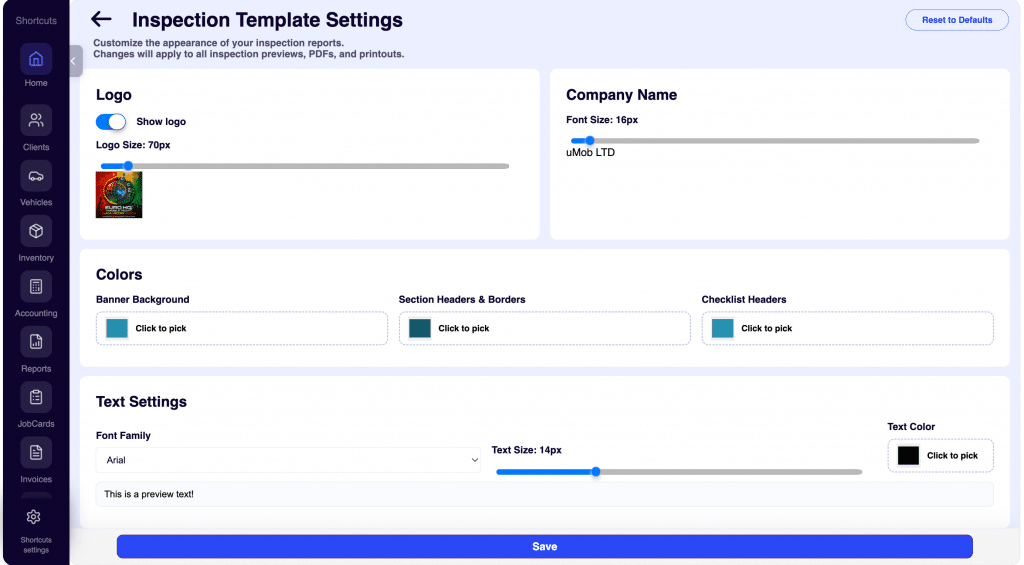
Customer-ready inspection reports combine clear findings with consistent shop branding.
What is a digital vehicle inspection?
A digital vehicle inspection (DVI) is a software-based process for inspecting, documenting, storing, and sharing vehicle condition. A technician completes the inspection on a phone, tablet, or computer and can add status labels, notes, photos, damage marks, or other evidence to the report.
A multi-point inspection (MPI) describes the inspection itself: a structured review of multiple vehicle systems or components. A DVI is the digital tool and workflow used to perform and communicate that inspection.
In practice, a shop may complete an MPI inside its DVI software.
Paper checklist versus digital vehicle inspection report
| Paper inspection | Digital vehicle inspection |
|---|---|
| Handwritten notes can be difficult to read | Typed notes can follow a consistent, readable format |
| Photos live separately, if they are taken at all | Photos can be tied to a specific finding |
| Copies can be lost or filed inconsistently | Reports can stay connected to the client and vehicle record |
| Updating a checklist means printing a new form | Templates can be revised for different services |
| Sharing usually requires an in-person handoff or scan | Reports can be shared by link, email, SMS, or PDF when supported |
| Branding is limited to the printed form | Digital reports can use the shop's logo, colors, and disclaimer |
Digital does not automatically mean better. A disorganized digital form simply produces a more legible bad report. The process and standards still matter.
Step 1: Choose the right checklist for the visit
One oversized inspection template is tempting, but it can create skipped items, rushed answers, and unnecessary work.
Build templates around the service or use case:
- General courtesy or multi-point inspection
- Oil-service inspection
- Seasonal or trip check
- Brake inspection
- Tire and alignment check
- Pre-purchase inspection
- Fleet preventive maintenance
- Vehicle intake or damage walk-around
- Mobile-service arrival and departure condition
The template should be thorough enough for the promised service and short enough to be completed consistently.
Each item should tell the technician what to inspect. “Brakes” is vague. Separate items for visible pad condition, rotor condition, hydraulic leaks, warning indicators, and measured values—when your process requires them—create a more useful record.
Do not present a shop checklist as a state inspection, safety certification, or regulatory inspection unless the shop, technician, procedure, and report actually meet the applicable requirements.
Step 2: Tie the inspection to the correct record
Before inspection begins, confirm:
- Customer or fleet account
- Vehicle year, make, and model
- VIN or unit number
- License plate where appropriate
- Mileage or operating hours
- Work order, invoice, appointment, or service visit
- Technician and inspection date
This prevents a perfect report from ending up on the wrong vehicle.
For mobile mechanics, record the service location and initial condition when useful, but do not capture unnecessary personal information in photos or notes.
Step 3: Document the starting condition
An intake walk-around establishes context before work begins.
- Photograph each side of the vehicle when the service justifies it.
- Record obvious pre-existing exterior or interior damage.
- Note warning lamps, mileage, fuel or charge level, and other agreed intake details.
- Use a damage layout or schematic when it makes the condition easier to understand.
- Distinguish customer-reported concerns from technician-observed findings.
For collision-related work, pair the condition record with a complete repair plan. See our guide to auto body labor times and estimate operations.
The purpose is a reliable condition record, not a photo album. Capture what someone reviewing the file later would need to understand.
Step 4: Define status labels that mean the same thing every time
Whether your DVI software uses Good/Fair/Poor, Pass/Attention/Fail, or green/yellow/red, the shop needs written definitions.
For example:
- Good / Green: No service recommended based on this inspection.
- Attention / Yellow: Service is not presented as immediately urgent, but the condition should be monitored or planned.
- Poor / Red: The shop recommends prompt attention based on the observed condition.
- Not inspected / Not applicable: The item could not be checked or does not apply; include a reason when useful.
These are examples, not universal legal or safety definitions. Build categories appropriate to your services, local rules, and professional judgment.
Avoid using red simply to make a recommendation look more urgent. Consistency helps build trust; artificial urgency undermines it.
Step 5: Capture photos that actually prove the finding
The best inspection photo answers, “What am I looking at, and where is it on the vehicle?”
Use a context photo and a detail photo
When the issue is not obvious, take:
- A wider image showing the component's location
- A close-up showing the condition
A tight photo of a leak or crack can be convincing only if the viewer knows which component is in the image.
Make the condition visible
- Clean the lens.
- Use adequate light.
- Hold the camera steady.
- Focus on the relevant area.
- Remove visual clutter when safe.
- Use an annotation only when it clarifies the finding.
- Include a ruler, tread gauge, or measurement display when your process requires an objective value.
Keep the report professional
Do not attach unrelated shop photos, accidental screenshots, faces, private documents, addresses, payment information, or other unnecessary personal details.
Before sending, ask whether every image helps the customer understand the finding or meaningfully documents the service record. Delete duplicates and unclear photos.
Step 6: Write findings a customer can understand
A useful note contains four or five parts:
- What was checked
- What was observed
- Why it matters
- What the shop recommends
- How the shop prioritizes it, when appropriate
Weak note
“Bad belt.”
Clearer note
“Serpentine belt shows cracking across multiple ribs. Recommend replacement and inspection of the tensioner before further deterioration causes belt failure.”
Keep the language factual. The inspection documents the condition; the estimate should present the repair scope, parts, labor, price, and authorization.
Avoid a diagnosis that has not been performed. “Oil residue visible at lower engine area; cleaning and further inspection recommended to identify the source” is more accurate than naming a failed seal without evidence.
Step 7: Review before sharing
The technician may complete the checklist, but a service advisor, lead technician, or designated reviewer should check customer-facing reports when the workflow allows it.
DVI quality-control checklist
- Correct client and vehicle
- Mileage and visit details present
- Required checklist items completed
- “Not inspected” items explained where necessary
- Status labels used consistently
- Important yellow/red findings supported by evidence
- Photos are clear and belong to the right item
- Notes are factual, readable, and free of unexplained shorthand
- Recommendations match the observed condition
- No duplicate or contradictory findings
- No unnecessary personal information
- Branding and contact details are current
- Disclaimer is appropriate
- The follow-on estimate or work step is ready when needed
A short review can prevent avoidable follow-up calls and corrections caused by a confusing report.
Keep the inspection and estimate in their proper roles
The DVI report explains what the shop observed. The estimate explains what the shop proposes to do and what it will cost.
A clear sequence is:
- Complete the inspection.
- Review the findings.
- Build recommended repair items in an auto repair estimate.
- Share the report and estimate with the customer.
- Record approval or decline in the appropriate document.
- Keep the inspection with the vehicle's service history.
Do not promise that an inspection automatically authorizes work. Obtain the signatures or approvals required by your shop process and local law.
Create a template strategy, not a template collection
Too many templates can be as confusing as one giant checklist. Give each template:
- A clear name
- A specific use case
- An owner responsible for updates
- A last-reviewed date
- Required photo or note rules
- A target workflow—not a rushed time promise
Review templates after technicians use them. Remove duplicate items, clarify vague instructions, and add missing steps only when the addition improves the inspection.
How to introduce DVI without frustrating technicians
The rollout will struggle if technicians see DVI as extra paperwork that ignores the reality of working in the bay.
Start with one manageable inspection
Roll out a core checklist on a defined service. Observe how it works during a real day before adding more templates.
Define the minimum standard
Tell technicians which items need photos, what each condition status means, and how detailed notes should be. “Take more pictures” is not a process.
Make the device practical
Consider gloves, lighting, camera access, connectivity, charging, protective cases, and where the device will be stored. A technically capable app is useless if the technician has to leave the bay after every item.
Audit reports constructively
Review a sample of completed DVIs each week. Look for unclear photos, inconsistent ratings, and repeated skipped items. Fix the template or training when the same problem appears across the team.
Track quality before revenue
Start with completion rate, clear-photo rate, report-review time, and customer questions. Avoid promising a specific increase in repair approvals or average repair order without your own measured evidence.
What to look for in digital vehicle inspection software
- Works well on the phones, tablets, and computers your team uses
- Default and custom checklist templates
- Clear condition statuses
- Photos and item-level notes
- Damage-report layouts or vehicle diagrams
- Connection to the correct client, vehicle, and work record
- Branded customer-facing report or PDF
- Sharing by the channels your customers use
- Inspection history
- A clean path from finding to estimate or work order
- User roles and permissions
- Reliable operation with your shop's connectivity
- Measurement fields for tread depth, brake-pad thickness, voltage, or other objective readings your shop records
- A customer view that works well on a phone without requiring an app download
- Offline or queued uploads if the shop has unreliable connectivity
- Completion or adoption reporting if multiple technicians perform inspections
- Required-field controls where missing a critical check would create a workflow problem
- Clear plan limits for users, storage, photos, and advanced features
- Export and retention options appropriate to your business
Compare the entire workflow, not one screenshot. Ask a technician to complete a sample inspection before committing.
How ARI handles digital vehicle inspections
ARI's Vehicle Inspections let shops use a default checklist or create custom checklist templates, apply Good/Fair/Poor condition statuses, add notes, mark damage on vehicle layouts, generate PDF reports, and share inspections with clients. Inspections can also stay connected to the vehicle and repair workflow.
ARI supports report controls for the shop logo, colors, fonts, and disclaimer. Shops can also use vehicle damage layouts and, where available under the current plan, attach photos to inspection items. See the guide to customizing inspection reports in ARI.
ARI plan features can change, so confirm current photo-attachment and AI-feature availability on ARI's pricing page or inside the app before choosing a workflow.
An ARI inspection can support the next estimate or Job Card step, but the inspection itself should not be treated as customer authorization for repairs unless the required approval is captured separately.
Explore ARI Vehicle Inspections to see how checklists, damage documentation, branded reports, and the follow-on estimate workflow fit together.
Frequently asked questions
What is the difference between DVI and MPI?
An MPI is a multi-point inspection process. A DVI is the digital software and workflow used to complete, document, store, and share an inspection. A shop can perform an MPI using DVI software.
What should a digital vehicle inspection report include?
At minimum: the client and vehicle, date and mileage, the checklist used, a status for each inspected item, clear notes, relevant photos or damage marks, technician identity, shop details, and an appropriate disclaimer.
Do technicians need a tablet for DVI software?
Not always. Many systems work on phones, tablets, or computers. Choose the device that fits camera use, gloves, screen size, connectivity, and the physical inspection workflow.
How long should a digital vehicle inspection take?
There is no universal time. It depends on the promised inspection, vehicle, template, measurements, documentation standard, and findings. Set a quality target appropriate to the service rather than rushing to an arbitrary number.
Should every finding include a photo?
Not necessarily. Photos are most useful for important abnormal conditions, pre-existing damage, measurements, or items a customer cannot easily see. Your shop should define consistent evidence rules.
Can a customer approve repairs from a DVI report?
Some software connects findings directly to approval workflows, but capabilities vary. In ARI, use the inspection to document findings and the estimate workflow to present recommended work for approval.
Can a shop customize its DVI checklist?
That is a core feature to look for. Custom templates let a shop match the checklist to its services, but each template should have a clear purpose and review process.
How much does digital vehicle inspection software cost?
Pricing depends on whether DVI is a standalone product or part of a complete shop-management system, as well as user limits, storage, media features, customer communication, reporting, and integrations. Compare the complete workflow and current plan limits—not only the advertised monthly price.
The bottom line
A customer-ready DVI is not the longest checklist or the report with the most photos. It is the report that consistently shows what was checked, what was found, why it matters, and what happens next.
Build the workflow around clarity: choose the right template, document the right vehicle, use consistent ratings, capture useful evidence, write factual notes, review the report, and keep authorization in the estimate or work document where it belongs.
Explore ARI Vehicle Inspections to connect custom checklists, damage documentation, customer-ready reports, and the next estimate or Job Card step.